“Born this way” was one of the first titles that came to my mind for this post. I really like the humor here which lies in the dual meaning of the phrase: 1) it indicates the attitude to embrace our inherent nature, and 2) it can be understood (maybe not for the native speakers) as born (in) this way - illustration of how something is born.
(Isn’t it some sort of a humor to explain the humor?😮💨)
Below I will write down how I built my blog.
Hexo
I built my blog following the tutorial of @DID321 (Di Wang), you can find his excellent tutorial here on bilibili, note that the tutorial is in Chinese. Many thanks for his sharing~
Install Git and NodeJS
Git
Download Git here and install it. When it is done, you can find git options if you right click on any folder.
NodeJS
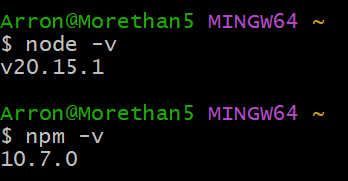
Download Node.js here and install. You can check if the installation is successful using the commands below in Git Bash. To open the git bash, you can either right click on any folder or find Git Bash in your Start menu if you are using Windows.
1 | node -v |
Install Hexo
You can find the documentation of Hexo here. If you did not quit Git Bash after checking the installation, just keep typing the following code, otherwise, you need to open git bash again 👉👈
1 | npm install -g hexo-cli |
I ran into one problem here (seemingly failed to connect), so I used the mirror site from aliyun, more details 👉 NPM镜像_NPM下载地址1
2
3
4# change to mirror site
npm config set registry https://registry.npmmirror.com
# install hexo
npm install -g hexo-cli
Initialize your blog
After installation of hexo, you need to create a new folder or use your existing folder as your blog folder. Right click on the selected folder, and choose git bash~ After execute the commands below, hexo is going to prepare all files needed for a hexo blog in the selected folder.
1 | hexo init <folder name of your blog> |
Select a theme (optional)
You can find many many Hexo themes here. I chose the theme cupertino and theme chic. Here I will show you how to configurate your cupertino theme.
First, you need to go to the GitHub repository, and download the theme repository as zip. Unzip the file and put it in the themes folder under your root directory of your blog folder.\themes.
Configuration
There are two configuration file, both called “ _config.yml”, one is in the root directory of your blog .\_config.yml; another one is in the theme you download .\themes\hexo-theme-cupertino-master\_config.yml. Let’s call them site config and theme config correspondingly.
site config
To make sure the theme works properly, you need to open the site config and copy-paste the theme folder name there.
Also, don’t forget to change some basic information of your blog.

Theme config
You will not find a better guidance than the document by the author (@MrWillCom (Mr. Will)) of this theme. You can find it here: Introduction – Hexo Theme Cupertino
Here I am only about to address one thing that is sorta unclear in the documents.
Mathjax
I followed this tutorial to configure mathjax - Hexo渲染数学公式:配置方法与原理浅释.
As before, you need to run some commands in Git Bash. It is said that kramed is a better renderer, so, let’s uninstall the existing renderer and install this one!
1 | npm uninstall hexo-renderer-marked --save |
Now, in your theme config, add those lines:
1 | mathjax: |
Then, in your site config, add those below:
1 | math: |
Next, we need to add a JavaScript snippet. The snippet will be part of the theme, so we go to the theme folder .\themes\hexo-theme-cupertino-master, there should be a layout sub-folder. You can create a text file in the layout folder -> copy paste the code below -> save -> rename the text file into “mathjax.ejs”.
1 | <% if (theme.mathjax.enable){ %> |
Lastly, we need to add the following lines below to call the snippet above when needed. The code below need to be added to post.ejs in the same layout folder as abov.
1 | <% if (theme.mathjax){ %> |
Cool, now you can enjoy writing in math~ But don’t forget to add mathjax: true in the YAML of your post when you need to use mathjax.
1 | --- |
GitHub pages
Here is an intuitive instruction on creating a GitHub Pages site
connect to GitHub
To use GitHub to host the blog, we need to connect to GitHub using the Secure Shell Protocol (SSH). Now we need to use Git Bash again, here is the code to generate your SSH:
1 | git config --global user.name "user name" |
Three questions will be asked, note that when you enter the passphrase, nothing will be shown including *, don’t panic (I did🥲), just input the passphrase twice~1
2
3Enter file in which to save the key (/c/Users/XXXX/.ssh/id_rsa):
Enter passphrase (empty for no passphrase):
Enter same passphrase again:
You can then see you SSH with the command below:1
cat ~/.ssh/id_rsa.pub
Now you need to go back to GitHub, in the upper-right corner of any page on GitHub, click your profile photo, then click Settings. Then:
- In the “Access” section of the sidebar, click SSH and GPG keys.
- Click New SSH key or Add SSH key.
- In the “Title” field, add a descriptive label for the new key. For example, if you’re using a personal laptop, you might call this key “Personal laptop”.
- Select the type of key - Authentication Key.
- In the “Key” field, paste your public key.
- Click Add SSH key.
Here is the official instruction on how to add a new SSH - Adding a new SSH key to your GitHub account - GitHub Docs
Then you can test the connection (especially important if you are setting the connection for the first time) Use the command below in your git bash:
1 | ssh -T git@github.com |
If you get an warning message like this:
1 | > The authenticity of host 'github.com (IP ADDRESS)' can't be established. |
Then you need to verify that the fingerprint in the message you see matches GitHub’s public key fingerprint. If it does, then type yes. You might be asked to provide the passphrase here, hope you remember it 😮💨 When you see the message below, then your connection is very successful~
1 | > Hi USERNAME! You've successfully authenticated, but GitHub does not |
Lastly, we need to add more information in the site config:1
2
3
4
5# Deployment
deploy:
type: git
repo: https://github.com/iamacz/iamacz.github.io.git
branch: main
Deploy
Almost there!!! Now you need to install a plugin to help you deply, again we go back to git bash:
1 | npm install hexo-deployer-git --save |
Phew, now you can deploy your blog to GitHub~
Here are some useful command:
1 | hexo g # Generates static files needed for your blog. |
You can always refer to these docs on how to use Hexo - Documentation | Hexo
Giscus
You can use Giscus to allow visitors to leave a comment in your blog. You can read more here: giscus: A comment system powered by GitHub Discussions.
I followed this tutorial to add giscus to my blog -> Hugo 博客引入 Giscus 评论系统
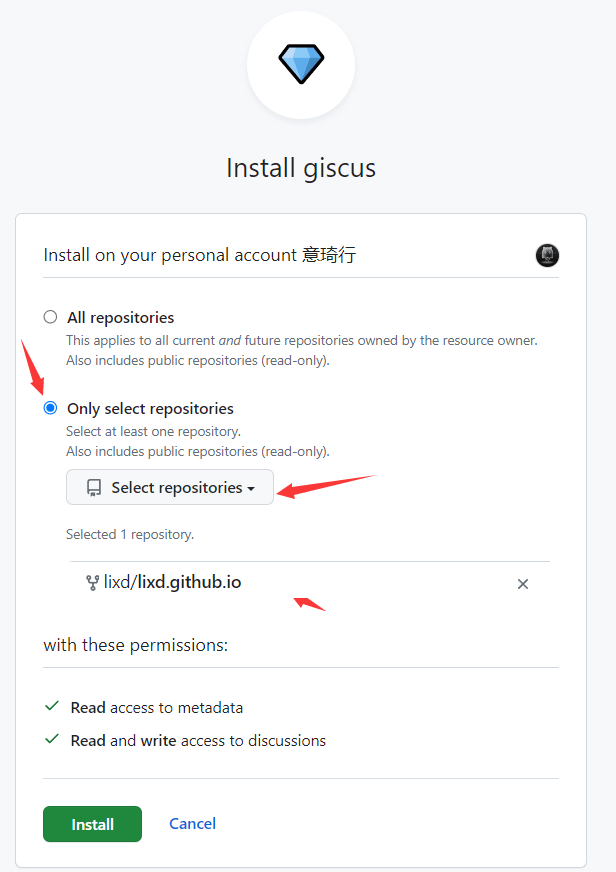
Install Giscus
Go GitHub Apps - giscus, click on the install, and select the blog repository on github. (Image from @lixd)
Enable discussion
See Enabling or disabling GitHub Discussions for a repository for instruction on how to enable discussion for your blog repository.
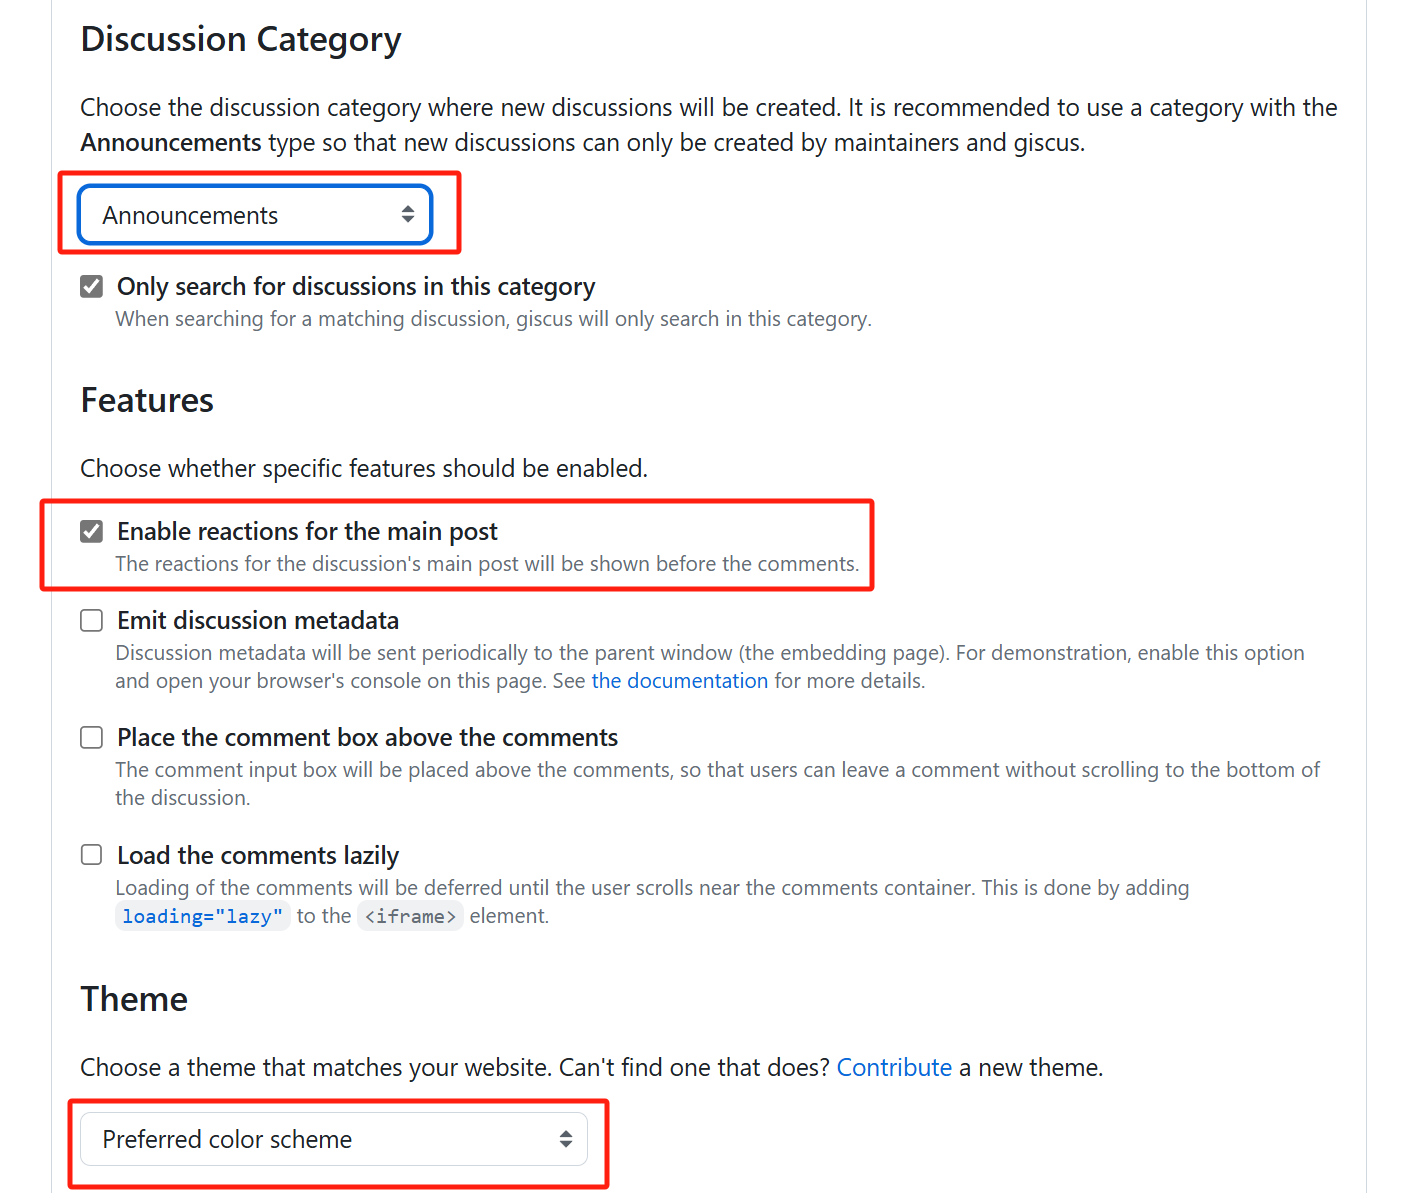
Config Giscus
Visit this site - giscus - to configure your Giscus. One recommended configuration are shown as follow. You can of course explore more possibility~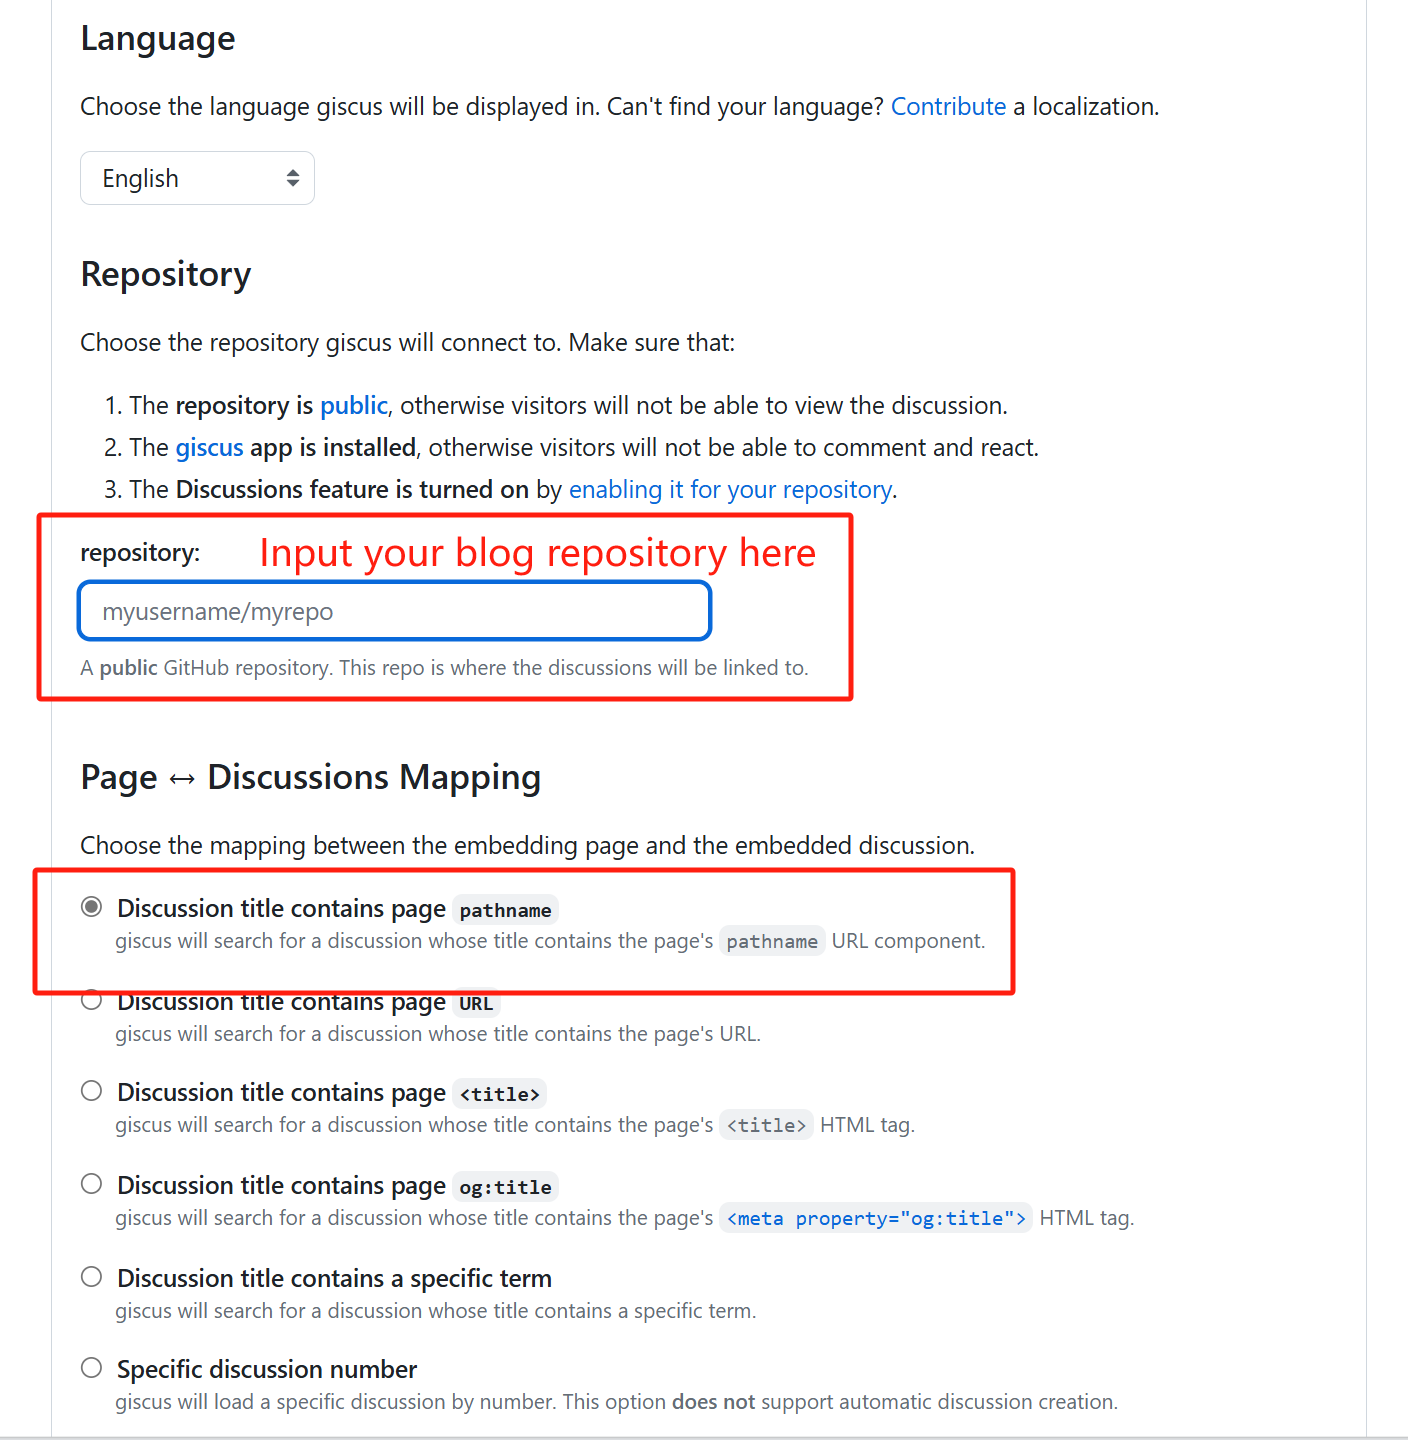
Enable giscus
The script will be generated automatically after you adjust the configuration above.
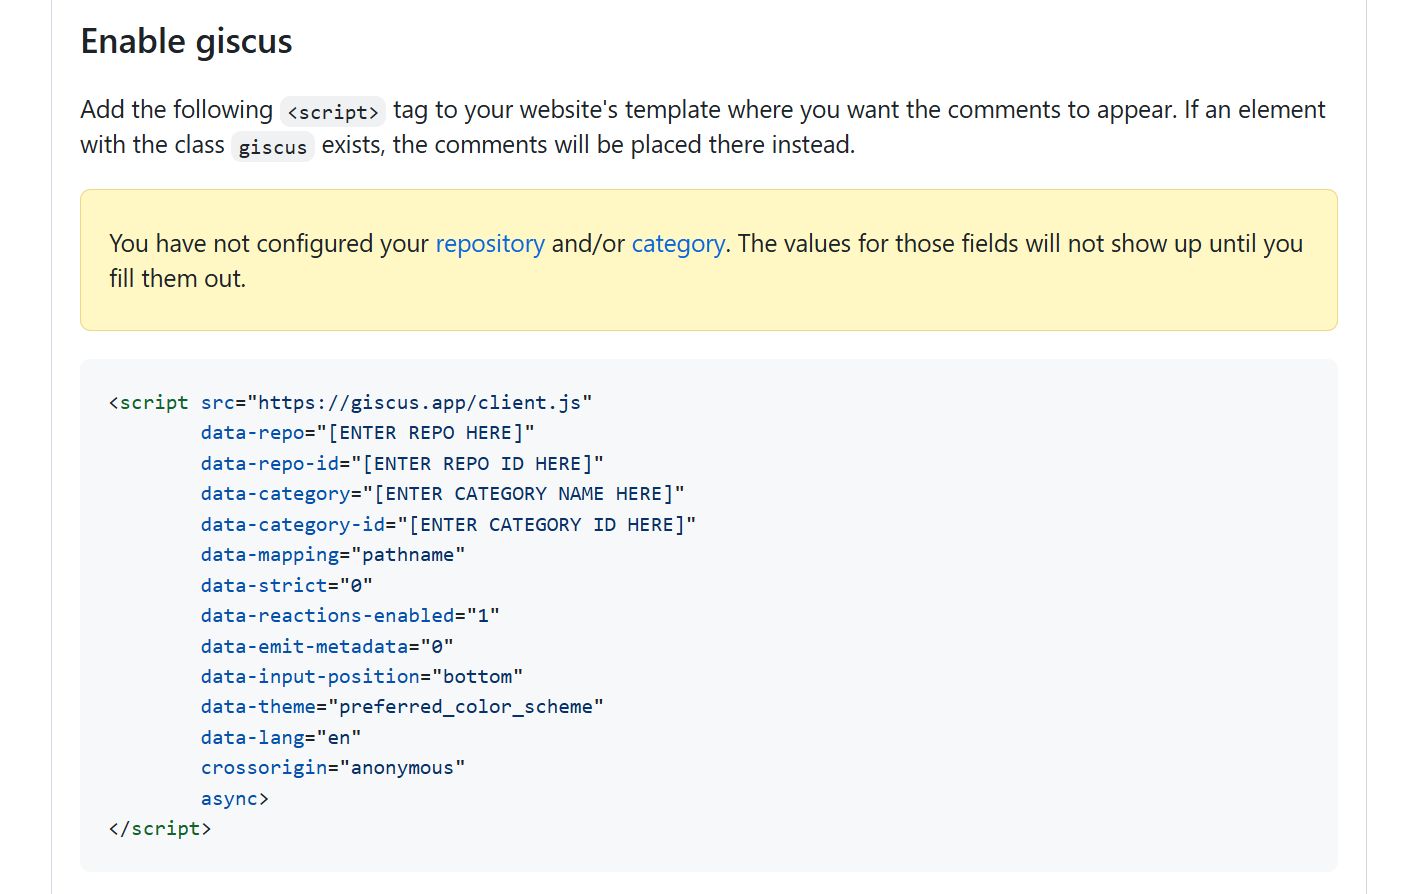
You can append the the script to the site config file. Remember to indicate that that the script is for giscus, see the code block below.
1 | giscus: |
About this Post
This post is written by Tangbin, licensed under CC BY-NC 4.0.